
When teaching bonding, I used to start with covalent structures, now I leave them until last. This is because I think covalent bonding presents particular challenges which can be mitigated by teaching at the end of the topic. Three main reasons for this are:
- Why covalent bonds exist at all is less intuitive than for ionic and metallic bonds. The electrostatic attraction is ‘hidden’ beneath the surface and can easily be missed if not emphasised – this needs to be carefully drawn out and explained.
- The distinction between giant and simple covalent structures and the profound influence this has on material properties.
- The exceptions with unusual properties, such as graphite and polymers.
In teaching covalent bonding, I follow a similar overall pathway as I would for ionic and metallic structures, beginning with the macroscopic properties before zooming in to look at the particles which make up the structure, what is holding them together, and how the interactions between particles on the sub-microscopic level can explain those macroscopic properties which students are familiar with. I start with the concrete which has been experienced and observed, then bring the students into the abstract world which we can’t see or experience, but which they need to understand. Rather than walking you through my entire teaching sequence (this gets quite repetitive from one bonding type to the next and my previous blogs will give you a good idea of the approach I take) I’m going to focus on the particular challenges which trip students up in developing their understanding of covalent bonding.
1. What is a covalent bond?
Students are usually happy with the idea of attraction between opposite charges. This makes explaining why ionic and metallic structures hold together quite straight forward. The oppositely charged particles are clearly visible in the representations of the structures which we draw – oppositely charged ions in an ionic lattice, and positive ions and negative electrons in metallic structures. Students will readily accept that there are electrostatic attractions between these particles which hold them together and require energy to break them apart or move them.

Covalent bonding diagrams, on the other hand, often just show shared electrons in dot and cross diagrams, or ball and stick diagrams, neither of which make the mechanism of the bonding explicit. I’ve often had students either with no idea about what’s holding the atoms together in a covalent bond, or with a belief that there really are microscopic balls and sticks!
How can covalent bonding be explained?
GCSE specifications require students to know that a covalent bond is “a shared pair of electrons,” what most do not make clear, is how this sharing of electrons holds the atoms together. A simple diagram can be used to show the electron pair being shared between the two atoms, and the electrostatic attraction which exists between this electron pair and both of the atoms’ nuclei. The balance between this and the repulsion between nuclei could be explored alongside this.

It’s definitely worth explaining this to help students understand the mechanism of covalent bonding and for the gains it brings in terms of their being able to link back to the properties of giant covalent structures – particularly the high melting point. When students can see that covalent bonds, like ionic and metallic bonds, are due to electrostatic attractions between charged particles, it helps them to understand this similarity in properties. It also helps to develop an understanding of the distinction between covalent bonds and intermolecular forces in explaining what’s happening on the microscopic scale when molecular substances change state.
This understanding can then be linked back to the ball and stick model (a great opportunity to explore what we mean by a model in science), where the sticks represent these shared electrons and their electrostatic attractions, and are used to indicate the number and directionality of the bonds between different atoms.
Equipped with this more developed understanding of covalent bonding, I find students are much more confident in explaining how the properties of ‘standard’ giant covalent structures (e.g. diamond and silicon dioxide) relate to their properties. Graphite is a different story which I will revisit later on.
2. Simple molecular substances
The second challenge stems from the range of properties of covalent substances, particularly their melting and boiling points. Once covalent bonding is understood, the giant structures are relatively straightforward to explain. In all the giant structures, the diagrammatic representations we use tend to show the particles which are being freed from the constraints of the lattice or completely separated during a change of state. A particle in these diagrams, represents an atom or ion and we are breaking these apart – these atoms or ions can easily replace an individual particle in a generic change of state particle diagram.
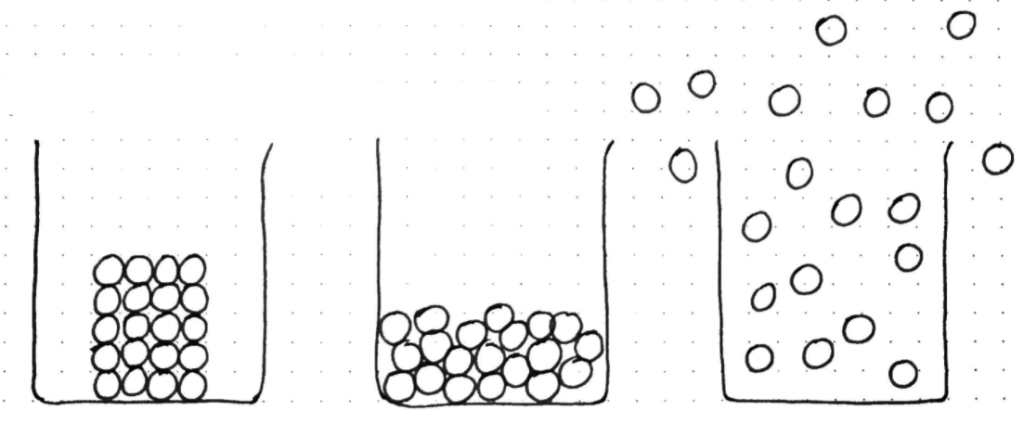
However, simple molecular structures are more challenging to explain, because if we return to our generic particle diagrams which students will have seen over and over again, a particle now represents multiple particles (covalently bonded atoms) – this cannot be overemphasised. This is why I always begin this topic by reviewing these diagrams and changes of state, and then refer back to these diagrams as I zoom into the sub-microscopic representation for each structure type, reiterating over and over again what the particles represent in each case:
| Structure type | What do particles represent? | What is being broken during melting/boiling? |
| Giant Ionic | Positive and negative ions | Strong electrostatic attractions between oppositely charged ions |
| Giant Metallic | Positive ions and negative electrons | Strong electrostatic attractions between positive ions and negative electrons |
| Giant Covalent | Atoms | Strong covalent bonds (electrostatic attractions between electron pair and nuclei) |
| Simple Covalent (Molecular) | Molecules | Weak intermolecular forces between molecules |
In the case of the simple covalent structures, I would draw a generic solid particle diagram before asking what the particles represent if this was water. Students will recognise that they are water molecules. So what is a water molecule? Two hydrogen and one oxygen atoms bonded together with strong covalent bonds. I would then get students to draw their own diagram, and draw a water molecule, including the bonds, into each particle. I then repeat the process for liquid and again for gas, until all students will have a diagram which looks like this:

I emphasise throughout, that the covalent bonds are strong and that they are not being broken when melting and boiling are taking place. Each particle in the gas diagram still represents a whole water molecule. The molecule has not been broken. Next, I start questioning about the melting and boiling points of water and how these compare to those of giant covalent structures. What does this tell you about the strength of the interactions between the particles (water molecules)? Students will usually recognise that these must be weaker interactions and I then introduce the terminology – intermolecular forces. For some classes I might start to delve into the details of what these forces are, but this depends on my judgement as to whether this will confuse or enlighten the particular students involved.
I would then talk through more examples – making sure to use a mixture of liquids and gases at room temperature – ensuring that students recognise what a ‘particle’ represents in each case, and what interactions are being broken in melting and boiling. Although quite laborious, breaking down the steps like this does seem to develop a more secure understanding of the differences between the giant and simple covalent substances. I have also found that teaching covalent bonding last, with intermolecular forces being introduced at the end of the topic, once students have had plenty of chance to practice answering questions about the giant structures, results in fewer answers being peppered with ‘intermolecular forces’ regardless of the structure type being discussed!
The final comment I want to make regarding the two types of covalent structure is how to get students to distinguish between them. I have tended to go about this by encouraging students to consider the properties of a substance, rather than memorising lots of examples. Most examples in questions will be substances for which students are familiar with the properties or are given information about them. This means they should be able to recognise whether the structure is giant or simple covalent from knowledge of melting/boiling points.
3. Unusual examples
The third major complication in understanding covalent structures is that there are some unusual examples. These could certainly be very sensibly taught at various different points within the course. I’ll very briefly discuss my thoughts regarding the two most common unusual examples.
Graphite
Graphite is categorised as a giant covalent structure, but the interactions between the layers are actually intermolecular forces. I would, therefore, hold off discussing graphite until after I have taught simple covalent structures. I then use graphite as an example to review the properties of giant structures, by giving some data about melting and boiling points and questioning students about what this reveals. Following this I introduce the unusual aspects of graphite’s properties and explain why these arise.
Polymers
I haven’t reached a conclusion about where I think polymers sit best within the teaching sequence. I can see a place for them alongside covalent structures, within organic chemistry and in the AQA Resources topic. It’s probably best to touch on them in all these places. Personally, my inclination is to leave them out of the structure and bonding topic altogether, because they don’t really fit well with either giant or simple molecular structures as polymer substances can exhibit such a range of properties. I would introduce polymers in later aspects of the course and use them as an opportunity to review learning – how do we know they have covalent bonding? Why do different polymer substances have different properties? Thermosetting and thermosoftening plastics – what leads to the difference in melting points? If all this complexity is brought into the bonding topic, I find it muddies the water. Whenever polymers are taught it is important for students to recognise that they are molecules.
But how to define ‘molecule’ in a useful and usable way is a subject for another day…
Other posts in this series:
Part 1: The Challenges
Part 2: Laying Foundations – The Particle Model
Part 3: Ionic Structures
Part 4: Metallic Structures

One thought on “Teaching Structure and Bonding (Part 5): Covalent Structures”